Wednesday, December 21, 2011

In the Garden: December 2011 - Backyard Salad

A bit of a potpourri here. I spent the last two days doing some cleaning up in the garden. The forecast is for warm days and cool nights with no rain. That fall garden I planted a few months back needed some tending. Lots of leaves to clean up. On the vegetable bed, aphids had infested the Brussels sprout bushes so I yanked them up. The onions are continuing their slow trajectory to spring. The romaine lettuce is doing pretty well. Some freezing temperatures a few weeks ago caused some of the leaves to brown. But new growth has come up since then. I cleaned them up and should have more lettuce in the coming weeks.

Surprisingly the tomato plants are still producing well into December which is quite unusual (and they're Early Girls!). Yesterday, I harvested about a dozen tomatoes. Most went into a batch of veggie broth. With the rest, we had a backyard salad with dinner--one that might be typical in the summer months but not the middle of December. Lettuce, chopped tomatoes, and a sprinkling of toasted slivered almonds.

I dressed the salad with some Penzey's Green Goddess dressing that I have had sitting in the pantry for awhile. I decided to give it a go and the results were not bad. I'd make it from scratch for company. But for a weeknight meal it's a nice change of pace. The recipe on the bottle needs some tweaking. It calls for 1 tablespoon of seasoning and I'd go with two. I thought they were too heavy on the mayo as well. I used about 7-8 tablespoons. The one tablespoon of vinegar might be better if it was lemon or lime juice.

Back in the garden, that cute little strawberry plant I had in a pot long ago had quietly spread onto the bed just about taken over the entire bed over the last number of months. We did get some tasty berries out of it, but it was getting too voracious so I pulled it all up. But I think I may be battling it again in the spring.

The peach tree got its first of three dormant sprayings to prevent peach leaf curl. Trying to be better about following my own advice. I tried to do a thorough spraying getting every part that I could reach. Another spraying before New Year's and another after the first of the year.

Finally, it was time to put up the barbecue for the season. That meant reseasoning the grills before storing them in the garage.

Wednesday, November 30, 2011

Persimmon Grilled Cheese

Growing up we had a lot of persimmons in the house. This was mostly due to the persimmon tree in my grandparent's yard. But the persimmons were the Hachiya variety. A few dozen would be placed on the picture window sill coaxing them into ripeness. We would cut them open and enjoy them and my mother would make multiple batches of persimmon bread for the freezer which we enjoyed throughout the year.

The persimmons that showed up in the box recently were Fuyus and I'm less familiar with them. But then I saw this recipe and I knew I had to make it.

Here's an excellent quick guide to persimmons.

The recipe comes from Bay Area writer and chef Eric Gower. He writes occasionally for the San Francisco Chronicle. He has a unique approach to food and he infuses everyday cooking with some global flavors and approaches.

Persimmon Grilled Cheese:
  • Gouda - original recipe called for goat gouda which I couldn't find at Whole Foods so I used a cow's milk gouda
  • Chevre - I used a plain chevre
  • Fuyu persimmons - slices of ripe, peeled persimmon
  • Bread - the better the bread the better the sandwich
  • Butter - see above
  • Black Pepper - a dusting of freshly ground pepper
The results were excellent. The creamy gouda complemented the milder chevre. The cheese flavors mixed nicely with the crisp, fruity persimmon. The Irish butter added a soothing extra element. It all worked well together.

(Updated Feb. 7, 2024)


Tuesday, November 8, 2011

Dill Butter


A huge bunch of dill arrived in our box this week. I mean, huge. If I dried this dill and stuck it in a jar, I would still be working on using it up a year from now.

Dill is subtle but aromatic. It's not a herb I go to often. So I felt at a bit of a loss as to what to do with all this dill.

I knew it would not last long so I decided to go back to my herb butter recipe I have done in the past. 

I also had a bit of leftover parsley on hand that I threw in as well. But the the most prominent herb is dill.

Dill Butter

Ingredients
  • 1 bunch of dill
  • additional herbs and black pepper as desired
  • butter
Directions
  • Let the butter soften at room temperature
  • Prepare dill by picking off the leaves and chopping
  • Combine butter and herbs in bowl or food processor
  • Spoon herb butter mixture onto a sheet of parchment paper and shape into a cylinder
  • Place it in the fridge to solidify overnight
  • Remove from fridge and let it soften slightly
  • Cut into individual pieces and place in a freezer baggie
Now that it's in the freezer, what do you do with it?
  • As you prepare a side of veggies, add a bit of dill butter. 
  • Add a dab to roasted salmon.
  • Prep the skillet with the herb butter prior to adding eggs on a weekend breakfast.
Some additional resources on the subject:

http://www.barefootkitchenwitch.com/the_barefoot_kitchen_witc/2010/07/dill-butter.html

http://allrecipes.com/Recipe/dill-butter/detail.aspx

http://www.foodnetwork.com/recipes/bobby-flay/grilled-corn-on-the-cob-with-dill-butter-recipe/index.html

http://www.foodrepublic.com/2011/04/08/grilled-salmon-dill-butter-recipe


Sunday, October 16, 2011

Applesauce and Apple Bread


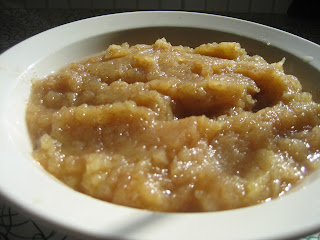
First off, never buy applesauce again. It is super easy to make at home and you get to control the ingredients and the amount of sugar (if any!). The results are excellent.

We found ourselves with a lot of apples recently. We've been getting them in the box and a friend gave us some apples from the tree in his yard. So I decided to make apple bread. I got online and looked around and settled on a recipe. But as I was reading the comments below the recipe a lot of people said they omitted the oil and added some applesauce instead. Less calories and it makes the bread moister. I had enough apples to do both. So let's start with the applesauce...

Applesauce
  • 4 apples, peeled, cored, coarsely chopped
  • 1/2 cup water
  • 1/2 teaspoon cinnamon
  • 1/4 teaspoon allspice
The original recipe called for 1/4 cup of sugar. Yikes! I added no sugar opting for a 1/2 teaspoon of honey. If you do want sugar just start with 1 tablespoon and build it up over time until you get it to your liking.

In a saucepan, combine all ingredients. Cover and cook over medium heat stirring occasionally for 20 minutes or until apples are soft. Allow to cool and then mash with a fork or a potato masher. I used my potato ricer.

This will make about a cereal bowl's worth of applesauce. It will keep in the refrigerator for a week or so. Now that I had the applesauce, it was time to make the bread.

Apple Bread
  • 3 cups of flour (I did 2 regular, 1 spelt)
  • 2 teaspoons cinnamon
  • 1 teaspoon baking soda
  • 1/2 teaspoon baking powder
  • 1/2 teaspoon salt
  • 1 cup applesauce
  • 1/2 teaspoon vanilla extract
  • 2 eggs, beaten
  • 1 cup white sugar
  • 1/2 cup brown sugar
  • 2 cups apples, peeled, cored, and coarsely chopped
Pre-heat oven to 350. In a large bowl, combine flour, cinnamon, baking soda, baking powder, and salt. Mix and set aside.

In a large bowl place applesauce, apples, eggs, sugar, and vanilla. Stir to mix.

Combine bowls and mix well. The batter will be pretty thick. Too thick? Add 1/4 cup of orange juice. Pour the contents into bread pans or muffin pans. Bake at 350 or 40-45 minutes. Use a toothpick to test. Cool for 10 minutes before removing from pans. 

I made one large loaf, 2 small loaves, and 6 muffins (There's only 5 in the photo because I had to test one!). This makes excellent muffins.

Saturday, October 8, 2011

In the Garden: October 2011

I did some planting today in the backyard. The tomato and gypsy pepper plants (there in the background) are still producing but probably not for much longer. A few weeks ago I pulled up the bean bush, basil plants, and red leaf lettuce. Today I put in Stockton red onions, Romaine lettuce, Brussels sprouts, and two broccoli plants. A cool weather garden.

Friday, September 16, 2011

Watermelon, Feta, and Kalamata Olive Salad

Watermelon is the classic summer fruit. We always had it growing up and I always recall how my mother would salt her watermelon. I thought it was strange until a friend served this salad to us a few years ago. The salty cheese and the cool, sweet watermelon make for an interesting contrast. Add some sliced red onions and mint leaves and you've got a nice study in contrasts.

This recipe is out on the internet in, literally, a half million locations, so it's nothing new. But I've been making it a few times a year during the summer since I was introduced to it. It's a refreshing and unique salad to serve during warm evenings. There's lots of room for your own interpretation. It doesn't last long so eat it up.

This recipe is from the Food Network but if you go through the half million versions of this recipe, you will find some interesting variations.

Watermelon, Feta, and Kalamata Olive Salad

Ingredients:
  • 4 pounds of fresh watermelon, cubed
  • 1/2 pound of feta cheese, crumbled
  • 1/2 medium red onion, thinly sliced
  • 24 kalamata olives, chopped (about 2 cups)
  • 1 cup of fresh mint leaves, chopped
  • 1/4 cup fresh lime juice
  • 1/4 cup EVOO
Directions:
  1. Place the watermelon, feta, onion, olives, and mint in a medium mixing bowl and set aside.
  2. place the lime juice in a small bowl. Slowly add EVOO while whisking to blend.
  3. Pour the dressing over the salad and toss gently
  4. Let stand for 20 minutes to allow the flavors to blend


Wednesday, September 7, 2011

Cherry Tomato, Hummus, and Olive Tapenade Flatbread Pizza

I found a tasty new way to use those cherry tomatoes that we're getting this time of year in our CSA box.

I adapted this from the latest Vegetarian Times spread called "Splendid Starters." When I saw this starter in the magazine I knew it would be the perfect appetizer to serve a friend who was coming over for dinner. We had most of the ingredients on hand and I could make some substitutions on other ingredients. The original recipe called for a base of puff pastry but I decided to use the Trader Joe's flatbreads instead.

The results were quite good and well received. The hummus and the olive tapenade are a perfect match. The package of tomatoes covered the three pizzas perfectly.

Cherry Tomato, Hummus, and Olive Tapenade Flatbread Pizza

Ingredients:
  • 1 lb. cherry tomatoes
  • 1 tbsp. olive oil
  • Trader Joe's Middle Eastern Flatbreads
  • black olive tapenade
  • hummus
  • herb mix like herbes de Provence or Bouquet Garni
  • salt and pepper
Directions:
  • Preheat oven to 425
  • Cut cherry tomatoes in half and toss with olive oil and seasonings
  • Spread the hummus around the flatbread just like you would the tomato sauce
  • Add about 1-2 tbsp. of tapenade and spread it around with the back of a spoon
  • Top the flatbread with tomatoes cut side up
  • Bake for 15 - 20 minutes or until the bread is crisp and browning on the edges
  • Serve warm or at room temperature

Wednesday, August 17, 2011

Alice Waters' Chez Pannise Turns 40


Here is Alice Waters' credo:
  • Good, healthful food is a right for all, especially children.
  • A civil society is one that cooks and eats together.
  • It all starts with respect for local, organic ingredients.
This is an excellent article on the history of Alice Waters and the organic food movement along with her current work with the Edible Schoolyard.

Read more: http://www.sfgate.com/cgi-bin/article.cgi?f=/c/a/2011/08/13/MNH21KBTVS.DTL#ixzz1VLnlnBtq

Sunday, August 14, 2011

Peach Preserves


I made a visit to a neighboring suburban town to buy some eggs from our source. They also have an extensive garden and fruit orchard. So in addition to the 18 fresh eggs, I also came home with with a few pounds of green and yellow beans, some yellow cucumbers, and about twenty big, beautiful peaches that I decided would become my first attempt at peach preserves. Right on the heel of the apricot preserves the week before! But for this post I felt I should elaborate more about what I'm learning about canning and preserving.

I turned first to the bible of canning and preserving--The Ball Blue Book which had two recipes. But I was also intrigued by the Chunky Peach Preserves in Janet Fletcher's "Fresh From the Farmer's Market." So I ended morphing the three recipes.

Peach Preserves

Ingredients:
  • 10-12 large ripe peaches
  • sugar
  • lemon juice - 2/3 cup (I only had half a lemon on hand so that's what I used)
Now, as for the sugar, Ball Blue Book calls for 6 cups which seemed like a lot to me. If you look online, you will find varying amounts in the recipes including some with no sugar. I will continue to experiment with the amount of sugar but for this batch I went with about 4 to 4 1/2 cups.

Steps:
  1. Get a large pot of water boiling.
  2. As the water gets close to boiling, prepare a large bowl of ice water nearby.
  3. With a slotted spoon, lower peaches, a few at a time, into the boiling water and blanch for about 30 seconds.
  4. Transfer peaches to the ice water bath.
  5. When cool, lift out the peaches and peel away the skin.
  6. Cut the peaches in half, then fourths, then eighths, and then cut around the equator. The goal is to create chunks about 1 square inch each. Discard any blemished or bruised portions. Place the chunks into a large, non-reactive pot (glass or enameled cast iron).
  7. Add the lemon juice and sugar and stir until the sugar is dissolved.
  8. Let it sit for 12-18 hours or overnight. I did it overnight putting it in the refrigerator overnight.
Next Day:
  1. Slowly get the peach mixture to boiling, stirring frequently.
  2. Boil and stir frequently until the mixture is clear and the syrup is thick. The syrup should be golden brown.
  • If the syrup becomes too thick before the fruit is tender then add some boiling water (1/4 cup at a time).
  • If the syrup is too thin you can drain the fruit in a bowl and return the syrup to the pot and cook it until it thickens up.
  • A tip I have seen online is to spoon a bit of the syrup onto a small plate and stick it in the freezer for a couple of minutes to cool it. When you take it out it should jelly-like but still able to slowly flow when tilted.
Canning Process:

Once you have the preserves ready to get them into the jars start by sterilizing the jars by putting them into a dishwasher that sterilizes or put the jars in boiling water for 10-20 minutes. It's always a good idea to sterilize a few more jars than you think you'll need just in case. Place the lids in a separate pot of boiling water to sterilize.

When the preserves are ready, spoon them into a clean, hot jar within a 1/2 inch of the top. Wipe the rim clean with a towel dipped in hot water. Place lids on and secure tightly.

For long term storage, place the filled jars into boiling water that covers the jars by one inch. Boil 15 minutes for half-pint jars and 20 minutes for pint jars. Transfer with tongs to rack to cool. Sealed jars prepared this way can be stored in the pantry for up to a year.

This particular batch yielded four pints and a little extra.

If you are new to canning, Lehman's is a great place to get your supplies. They sell a canning starter kit where you can get the lid lifter, tongs, jar funnel, and other supplies that are essential to canning. I've also found some of these same supplies at garage sales and antique fairs.

Thursday, August 4, 2011

Apricot Preserves


We harvested a number of pounds of apricots from our tree in the backyard recently. Apricots have a very short season and shelf life so it's good to have ways to quickly utilize them and preserve them. Visit the California apricot web site to find out more information about California apricots.

I decided to try my hand at apricot preserves. I did some searching online and ended up borrowing heavily from this site. Not being a big sugar fan, I like how this particular recipe is lighter on the sugar than other recipes. I also like my preserves with chunks of the fruit. So in my version, I added the apricots in waves of thirds. The longer they cook, the more they will reduce down. So by doing them in thirds, I am going for a mix of pure jam along with some nice chunks of fruit.

Apricot Preserves
  • 20-30 fresh apricots
  • 1 1/3 cup sugar
  • 1/4 cup water
  • 2 Tbs fresh lemon juice
Directions:
  • Melt the sugar and water in an enameled cast iron pot or other non-reactive pot and bring to a boil until clear and syrupy.
  • Meanwhile, cut the washed apricots in half discarding the pits.
  • As you cut up the first third of the apricots, add them to the sugar mixture and stir to coat them. The fire should be on medium low so that the apricots cook down but it should not be bubbling.
  • Add in another third of the apricots when they are ready. Stir frequently.
  • Add in the final third. Stir until they are reduced but still chunky. Total cooking time will be an hour or more.
  • Add in the lemon juice and stir.
Sterilize some jars and add the preserves following proper sanitary canning techniques.

I can't yet say how it tastes. I put them in the pantry to enjoy later.

Sunday, July 24, 2011

In the Garden: July 2011


Came home from a vacation to find that the backyard produce was in full swing. I harvested five gypsy peppers, a small handful of strawberries, a large handful of green beans, and a bumper crop of basil.

There will be some pesto-making in the near future.

This will also be the first time that we've been around when the apricots ripen. So I will be borrowing a neighbor's ladder and harvesting some apricots.

Monday, July 4, 2011

Herbed White Bean Puree


Many years ago, a friend recommended this book and later I found it at a used book store. He recommended this recipe and I've made it a number of times. It has become one of my "go to" recipes for entertaining and it is always well received. It's easy to make, healthy, and it's easy to create variations of it.

Herbed White Bean Puree

  • 1 can of white beans, rinsed and drained
  • 2 cloves of garlic, minced
  • 1/2 cup of finely chopped scallions
  • 2 -3 tablespoons parsley, chopped
  • 1 tablespoon of capers, rinsed and drained
  • 1 tablespoon of lemon juice
  • basil - I used 3 fresh leaves. If using jarred, about 1 teaspoon
  • 1/2 teaspoon dried thyme
  • 1/2 teaspoon dill
  • 1/2 teaspoon tarragon
  • 1/2 teaspoon salt
  • 1/4 teaspoon white pepper
  • 1/4 teaspoon nutmeg
  • dash of hot pepper sauce (optional)
Directions:

First off, don't worry too much about having all of the exact ingredients. You can improvise on the herbs.

In a food processor, add all ingredients except the hot pepper sauce. Process until smooth. Salt and pepper to taste. Add hot pepper sauce if desired.

Transfer to a serving dish and add a garnish of herbs. Serve with sliced baguette, bread sticks, or fresh vegetables.

So easy!

Monday, June 6, 2011

Bok Choy Stir Fry


When you have a CSA box there are times when the objective is to just blast through a certain ingredient because you have an overabundance of it. That was the case this weekend with the bok choy. As I went through the latest delivery on Friday evening I found 5 heads of bok choy. There were still 3 from last week's box! What to do with 8 heads of bok choy?

The solution: A bok choy stir fry with shrimp, carrots, and garlic.


I sliced up 5 of the bok choy heads. You need to carefully clean them since they can be gritty. I also sliced up the last 3 carrots from the box. Took out some frozen shrimp from the freezer. Stir fried the shrimp first along with some minced garlic in a wok with canola oil. Then added everything else and topped it with my go to sauce which I adapted from a LA Times recipe saved from years ago.


Chinese Chili Sauce

  • 3/4 tablespoon of Chinese red chili paste or Sriracha ("rooster sauce")
  • 1 teaspoon sugar
  • 2 teaspoons cornstarch
  • 2 tablespoons soy sauce
  • 1 tablespoon sherry
  • 1 tablespoon fish sauce
  • 4-6 tablespoons of water

You can vary the amount of chili paste depending on your tolerance for spiciness. I find that 3/4 tablespoon is medium. One tablespoon for very spicy.
Stir the sauce well to blend the ingredients.

As the stir-fry nears completion, add the sauce and stir to mix. If the sauce is too gummy add more water. Keep stirring until the sauce is coating all of the ingredients.

Serve immediately as is or over a bed of Jasmine or white rice.

Sunday, May 22, 2011

CSF: One Step Closer


Last month, I was introduced to the concept of "community-supported fishery" or CSF. My initial investigations revealed (surprisingly) that we don't yet have this in the bay area. I figured that it was just a matter of time, though, before we did.

Today's paper had an article that shows that we are one step closer to that reality.

In the same way that you can pay up front to receive a once-a-week delivery of just-picked fruit and vegetables directly from a local farm, expect someday soon to enjoy that same convenient service with fresh seafood caught by Bay Area family fishermen.

The concept of community supported agriculture, in which consumers purchase a subscription or membership to a farm to receive seasonal produce boxes, has been transported from soil to sea in community supported fishery programs that have been popping up along the coastal United States. Now the first one in Northern California is set to begin on Friday at none other than Google.

Saturday, May 21, 2011

In the Garden: May 2011


The last few weekends has seen a flurry of activity. The city did its annual free compost giveaway and I got at least one of the three free bags mixed into the soil on the front bed. I let it work in for a week and then I've been slowly adding vegetables.

Front bed: Front to back: 6 Red Sails lettuce, 6 spinach, 9 basil, 1 gypsy pepper, 1 green bean bush, 2 Early Girl tomatoes in their cages. The drip system is in place and working. At the far end of each bed is some sort of flowering plant I put in last year to attract bees, humming birds, and butterflies. Seems to be working.

Back bed: I picked up a strawberry plant last fall because it was there at the nursery. Since then I've learned that it is a spring/summer plant. Consequently, it didn't do much until now and it's finally getting full of strawberries. I'm hoping it will be done with soon so I can tear it out and get some late summer veggies going.

Sunday, May 15, 2011

Breakfast from the Box


Something cool occurred to me as I was making our Sunday breakfast: I knew the source of just about every ingredient. Most of it came from our weekly CSA box but for those that didn't I knew where it came from. Here's how it went.

I began by cutting up a couple of fingerling potatoes and sweet potatoes (leftover from last week's box). I got them started in the skillet with some butter, black pepper, and a dash of salt.


Then I decided to go for a Southwestern egg scramble given the ingredients in this week's box. I started by dicing half of a yellow onion (from the box) and got it started in a skillet with some EVOO. While the onion cooked down, I diced half of a green bell pepper (from the latest delivery) and added it to the skillet. Four eggs (from a friend's backyard chickens) were whisked together along with some of Penzey's Southwest seasoning and into the skillet they went. I chopped up some cilantro leaves (from the box) and added them into the eggs. A diced avocado (finally ripened from last week's box) got added and then some grated cheddar cheese (OK, this was from Trader Joe's).

Oranges and tangerines (from this week and last) were juiced.

After plating, I sprinkled some dried parsley (from the backyard) over the potatoes and served.

All in all, an enjoyable locavore breakfast.

Sunday, April 10, 2011

CSF: Why Not Here?


We recently visited Charleston, SC with some friends and took part in a culinary walk. Charleston is really taking off when it comes to their food scene. They are very much into the local food scene with plenty of CSAs.

It was on this tour that I was introduced to the concept of CSF - Community Supported Fishery. These are just taking hold in the east and I found myself wondering if these are available here in the Bay Area.

Unlike my CSA, where you pay as you go, these CSFs require a one-time hefty down payment and then you get a certain amount of seafood as it's caught. Most CSFs follow sustainable practices and catch what's local and in season. They also independent and family-owned.

A Christian Science Monitor article describes how...

Two Maine brothers, John and Brendan Ready, sell subscriptions of lobster and other seafood under the name Catch a Piece of Maine. Their 150 subscribers receive shipments and can even go online to check on the status of their underwater investment.

These community-supported fisheries (CSFs) attempt to replicate the success of small farmers using the community-supported agriculture (CSA) model. Like CSAs, the idea is that shareholders will invest at the beginning of the season with guaranteed return of food dividends all season long.

Once home, I did some research. The nice folks in Charleston readily admit that Alice Waters and other Bay Area gurus are their inspiration. New restaurants there remind me of Berkeley's Gather where the source of every ingredient is documented on the menu. So if they have CSFs in Charleston, then we should certainly find them here, right? Well, not yet. It seems that
CSFs have not yet started here in the Bay Area. But it seems only a matter of time, according to the Monterey Bay Aquarium.

In the meantime, the best thing to do in the Bay Area is to use this page (scroll down) for a list of places to buy seafood off the boat or at a local farmer's market.

Read more:

Sunday, February 27, 2011

Slow Cooker: Tuscan Bean Stew


I picked up a slow cooker for an incredibly low price recently. It seems they are the media favorite right now. Everywhere you look, (from the supermarket check-out magazines, to emails from Sunset, to the latest cookbooks) someone is touting the virtues of the slow cooker. And then my friends and colleagues were all glowing when I asked them about their slow cooker experiences.

Well, I'm still early in on my journey but so far I've been pretty underwhelmed by the vegetarian slow cooker recipes I've seen and tried. They seem fairly bland and unimaginative. It seems that someone found the recipe book from the 1970s and put those recipes online. Haven't we learned some things since then?


Of course, I realize that I've added the extra challenge of trying fit the slow cooker into a vegetarian/pescetarian household. So I always have to be thinking about the substitute for the meat in recipes.


But I shall continue on my slow cooker journey and report out the worthy ones here. I have a few recipes on deck to try out in the near future. I've added a "slow cooker" label over to the right. too.
This slow cooker recipe was actually pretty good. Definitely a great starting point. I might add some additional seasonings next time to make it bolder.

I was also drawn to how this recipe used unusual beans which I have been wanting to explore.
The recipe calls for Borlotti beans which I made here for the first time. I was surprised to find them at my local Whole Foods. If you are looking for a good mail order store for rare or heirloom beans then be sure to check out Rancho Gordo.

This recipe was adapted from
an article in the San Francisco Chronicle and instead of chicken I used Soyrizo. Enjoy!

Slow Cooker Tuscan Bean Stew

Ingredients
  • 1 yellow onion, diced
  • 3 large carrots, peeled and cut into 1 inch chunks
  • 6 cloves garlic, peeled
  • 1 sprig rosemary
  • 1 tablespoon dried oregano
  • 1 bay leaf
  • 1 Parmesan rind
  • 1 14 oz. bag dried borlotti beans, soaked overnight in water
  • 1 14 oz. bag dried cannellini beans, soaked overnight in water
  • 5 cups of veggie broth
  • About 10-12 crimini mushrooms, sliced
  • 1 Soyrizo, squeeze it out of the casing
  • 1 28 oz. can San Marzano tomatoes, coarsely chopped
  • Salt and pepper to taste
Instructions:
  • Place the onion, tomatoes, carrots, garlic, rosemary, oregano, bay leaf, Parmesan rind, beans, and broth into the pot of a slow cooker. Turn the cooker on low for 6 hours
  • Remove bay leaf, rosemary sprig, and Parmesan rind. Add the mushrooms and cook for 1 more hour
  • Add the Soyrizo and cook another hour
  • Season with salt and pepper to taste

Saturday, February 26, 2011

Interesting CSA Alternative

This is an interesting development in CSAs. Imagine walking to your local restaurant to pick up your box? That's what's happening with this San Francisco restaurant where the chef now also provides a CSA box for pick up.

The boxes are part of chef and co-owner Dennis Lee's Community Supported Agriculture program, launched just two months ago as an alternative to the more traditional farm-to-consumer, subscription-style CSAs.

Filled with manageable amounts of vegetables and fruit for both individuals and families, the program also provides a direct line to the chef. It's about more than just getting ingredients for dinner.

His program allows customers to order a box up to about 36 hours before pickup. For $3 more, no advance orders are required; just walk in on a Sunday morning and purchase one, until they're gone. No need to commit to a weekly service.

A preordered small box, for one to two people, costs $15; a large box, feeding three to four, is $25.

Because the boxes are made up of produce from several farms, the selection can be relatively broad.

The produce is coming from County Line, Star Route, Torosian Farms, Dirty Girl and others, says Lee. A recent crate contained German butterball potatoes, Little Gem lettuce, shiitake mushrooms and lemongrass, among other items.

Tuesday, February 22, 2011

Cilantro Chutney


I have to admit that there's a hint of disappointment whenever cilantro arrives in the box. While I enjoy the flavor, it too often sits in the fridge until it's a shriveled, withered lump of future compost. I like cilantro in small amounts. It's great in salsas but I don't make salsa all that often. I've made cilantro pesto and cilantro-arugula pesto but they are second fiddle to a good basil pesto. I was almost getting to the point of getting it banned from the delivery box. But then I found this chutney.

One evening I was wondering how to prepare a piece of swordfish that we picked up that day. I saw a recipe for a cilantro-mint chimichurri in
Bobby Flay's Mesa Cookbook that looked quite tasty. I didn't have all of the ingredients on hand so I just kind of winged it using what I had on hand. It was pretty spicy but tasty.

Ironically, the next morning's newspaper had
this article and recipe and it is pretty darned close to what I had made the night before. The chutney can be used in a variety of ways as you'll see in the article.

Cilantro Chutney

Makes 1 cup

This Indian condiment is often made with both mint and cilantro, so feel free to substitute mint
leaves for some of the cilantro.
  • 2 bunches of cilantro - I just do one bunch
  • 2 cloves of garlic, minced - I used 3
  • 1 Serrano chili, seeded and chopped
  • 1/2 cup of water - I skipped this step
  • 6 tablespoons lemon juice (about 2 lemons) - I used limes instead
  • 1 tablespoon of sugar
  • 2 teaspoons of finely grated ginger
  • 1 1/2 teaspoon kosher salt - I just did one teaspoon
Instructions: Rinse cilantro well and let it dry completely. Pick of the leaves and discard the stems. Place garlic and chili in a food processor and puree until finely chopped. Add the remaining ingredients and pulse until a chunky salsa forms, scraping down the sides a few times to integrate all of the ingredients. Can be stored in the fridge for several days.

Saturday, January 22, 2011

Salmon Loaf - Revisited


It's fun sometimes to go back and revisit those classic recipes that you remember from childhood. We both have fond memories of our mother's making a pretty tasty salmon loaf (mostly on Friday nights). But when you really look at it, it's actually a pretty basic meal that was more likely made for its value and its ability to feed a family.

This web site, dedicated to preserving vintage cookbooks and recipes, has a scan of a salmon loaf recipe from 1942 (that included Rice Krispies!).

A few months ago, we noticed the canned salmon at our local supermarket and decided we should pick up a few and make that salmon loaf again someday. Well, that day came to pass recently.


I found lots of basic salmon loaf recipes online. But then I decided to take a different approach and do my interpretation of a recipe update. I'd keep the basics (canned salmon, eggs, bread crumbs) but up the herbs and seasonings. So that "dash of pepper" is updated to "generous." Many recipes call for only dried parsley so I broadened the list to add some variety. Then I decided to top it with something thoroughly modern - panko bread crumbs.

It's still a "value meal" and still quite tasty. Some roasted fingerling potatoes from the box and a bottle of Pinot from our cellar rounded out the meal. Our cat purred contentedly as we enjoyed it.


Salmon Loaf - Revisited


Ingredients:
  • 1 can (16 oz.) salmon
  • 1 cup bread crumbs
  • 2 eggs, lightly beaten
  • 1/2 cup milk
  • 3 Tbsp. lemon juice
  • 3 Tbsp. minced onions (I used about 1/4 of the red onion in the box this week)
  • 1 Tbsp. dried parsley
  • 1/2 tsp. dried dill
  • 1/2 tsp. salt
  • generous amount of black pepper
  • 1/2 tsp. Penzey's Mural of Flavor seasoning - or use any herb mixture: Italian Seasoning mix, bouquet garni, or whatever you have
  • dash of lemon pepper
  • pinch of "heat" - cayenne pepper, ground chili powder - I used Penzey's Arizona Dreaming seasoning
  • 1/2 cup Panko bread crumbs
Steps:
  1. Pre-heat oven to 350 degrees
  2. Open the can of salmon and flake the meat into a bowl removing any skin and bones (Feed your cat the skin and water).
  3. Add all other ingredients except panko bread crumbs. Stir to mix but get your hands in there and really mix it up.
  4. Place the mixture into a buttered casserole dish.
  5. Form the mixture into a loaf with your hands.
  6. Press a thin layer of panko bread crumbs into the loaf.
  7. Bake for 45 minutes, or until loaf is firm.

Sunday, January 9, 2011

In the Garden: January 2011


It's been awhile since I posted an "In the Garden" entry. After I cleared most everything out of the garden, we have had weeks of cold, rainy weather. It was a disappointing year. We had a cool cloudy summer which meant that the plants didn't take off. We got no basil last year. Hopefully, this year will be better. Today, was a nice enough day to get outside and take care of a few things in the garden.

Citrus
I harvested our first oranges! The tree was planted 3-4 years ago. It didn't produce anything for the first year or two. Then it produced something but they weren't oranges. Now it's starting to look like an orange tree.
I also harvested our first lemon as well. The peach tree got its first spraying of copper fungicide to prevent peach leaf curl.

Fall Garden
About a month ago I put two broccoli plants in the beds. They survived the few freezing nights we've had recently. Today I added a cauliflower. It says that in about 65 days I should have some cauliflower.

Monday, January 3, 2011

The Night Before Going Back to Work


It was Sunday night after a busy two weeks of family, friends, and food. Our refrigerator was full with a wonderful variety of leftovers from the holidays: Heavy cream and mushrooms from a tart I hope to post someday, smoked salmon slices from an appetizer for relatives for the day after Christmas, leftover yellow onions from the box recently. I looked around the fridge and came up with the following dinner for the Sunday night before going back to work. This also represents how I cook most weeknights after work. I just try to use up what's in the fridge and not follow any particular recipe. Most of the time it works out. The results here were delicious. I mixed in both cream and skim milk just so it wasn't a "heart attack" alfredo sauce. The salmon slices almost tasted like pancetta in the cream sauce. All of the measurements are approximate as I pretty much just winged it with the ingredients I had on hand. 

Creamy Smoked Salmon Pasta 

Ingredients:
  • pasta; I used Cavatappi
  • butter, about 1-2 tablespoons
  • 1/2 yellow onion, diced
  • mushrooms, about 2 cups, chopped
  • garlic, 3 cloves minced
  • smoked salmon, sliced thinly, about 2-3 cups
  • heavy cream, probably 1/2 cup
  • skim milk, probably 1/4 cup
  • pepper: freshly ground black pepper if you like it mild; a generous pinch of red pepper flakes if you like it spicy
Instructions:
  1. Bring a large pot of lightly salted water to a boil. Add pasta and cook for 8 to 10 minutes or until al dente; drain.
  2. As water boils, melt butter in a large skillet over medium heat. Saute onion in butter until tender.
  3. Add mushrooms and cook for a few more minutes.
  4. Stir in cream and milk. Heat to just below boiling point and cook over low heat for 4 minutes.
  5. Toss in smoked salmon, and cook for 2 more minutes. Serve over pasta.