Showing posts with label canning. Show all posts

Thursday, November 2, 2023

Instant Pot Applesauce

 I am fortunate to have a very prolific apple tree in my backyard. While I've made applesauce at home before, I did it the old fashioned way. Another way to make homemade applesauce is with the crockpot but it will take a number of hours. Using the Instant Pot is the quick and easy way to turn apples into applesauce. 

The apples don't have to be perfect. If you have a tree (or access to imperfect produce) you can trim around the imperfections, bird beak stabs, and other natural pitfalls.

This could not be an easier recipe and it doesn't take a lot of time. But there are two things to consider in order to make it how you like it: sugar and cinnamon. The recipe I found online called 2 tsp. of brown sugar but many of the comments said it was just as good without sugar (plus some apple varieties are sweeter than others). As for the cinnamon, the original recipe called for 1 tsp. but I decided to dial that back because, to me, cinnamon can overwhelm. So you will need to make this a few times and figure out what tastes best to you. 

The applesauce will keep in the fridge for awhile. You can also can the applesauce for later use.

Instant Pot Applesauce

Ingredients:

  • Apples - 3+ lbs. (any variety) peeled, cored, and chopped
  • Cinnamon - 1/4 tsp. (1/2 tsp. if you like more cinammon)
  • Water - 1/2 cup
  • Salt - dash
Instructions:
  1. Prepare apples
  2. Combine all ingredients in an Instant Pot and stir to mix
  3. Pressure cook on high for 5 minutes
  4. When done, let sit for 10 minutes
  5. Carefully, release the rest of the steam with the valve
  6. Stir with a whisk


Tuesday, September 24, 2013

Spicy Pickled Corn


I'm just starting to get into pickling. I've been drawn to a number of recipes that involve pickling recently. I'm fascinated by the process of preserving fresh produce in this method.

At this time of year it's all about preserving the good produce. Recently, our supermarket had Brentwood corn 6 for $1. Incredible. We picked up six ears and had two for dinner. I dog-eared this recipe in a recent Bon App magazine and gave it a try as way to use up the other four ears of corn. The photo in the magazine was gorgeous and it captured my curiosity.

I made 3 jars. I put up two and one was not filled enough to store so I stuck it in the fridge and figured out how to use it up. I have added the spicy corn to salads, omelettes, and stir fries with good success. It packs a spicy punch so be aware of the heat as you work with it.

I doubled this recipe:

Spicy Pickled Corn

In a large bowl, combine:
  • 2 small red dried chilies
  • 1 seeded thinly sliced jalapeno pepper
  • 1/4 thinly sliced medium red onion
  • 2 ears corn kernels cut off of cooked corn cobs (a few minutes in boiling salted water)
  • 1/4 cup fresh cilantro leaves
  • 1/4 cup lime juice
  • 1/4 tsp. coarsely ground black pepper
Brine
  • 1/2 cup white wine or apple cider vinegar
  • 2 tsp. kosher salt
  • 1 tsp. sugar
  • 3/4 cup water
Bring brine to a boil. Pack sterile jars with corn mixture. Pour brine over the corn mixture to fill the jar (I ended up doubling the already doubled brine mixture). Put the lids on the jars and put them in a hot water bath for 15 minutes. Or else stick jars in the fridge and use up the contents within a few weeks.

Saturday, October 6, 2012

Apple Pie Filling

My posts a few years ago had me troubled about my new apple tree. In its first few years it did not produce a whole lot of fruit. Maybe I was not giving it proper care or maybe it just needed a few years to mature. I'm not sure but this year I got a viable crop of apples. The coloring on the peel was still not what I expected but below the peel all was tasty.

A few weekends ago I harvested a shopping bag full of apples. In an earlier post, I had thought that I'd turn all my apples into canned applesauce, but some internet research got me interested in canned apple pie filling. I used most of my apple crop to make the 3 + quarts of apple pie filling. The rest will become applesauce. I was able to take some of the overflow apple pie filling to work with some yogurt the next day and it was quite tasty.

I won't go into the recipe here. Instead, I will just link you to the informative recipe I more or less followed.

Sunday, September 9, 2012

Canning Applesauce

A friend recently brought by a dozen apples from the tree in his yard. I had no idea what kind they were but they joined an already full plate of fruit from a variety of sources.

My own apple tree is getting close to harvest-time so I thought this might be a good test run on canning some applesauce.

So I ran down to my local hardware store and picked up a dozen half pint jars. I came home and stuck some in the dishwasher to get them sterilized. I followed my earlier recipe for applesauce again using some honey in lieu of sugar. In order to can the applesauce, follow the earlier recipe and then add these steps.

Once the applesauce is processed, bring the applesauce back to a boil. Using a canning funnel, ladle in the hot applesauce into sterile jars leaving a half inch of head space. Use a wooden chop stick or other non-reactive utensil to stir out any air bubbles. Clean the rim and screw on sterile lids.

Set the jars in a boiling hot water bath for 20 minutes. Remove them from the water and let cool on a towel for 12 hours. Check that the lids sealed. Put them away to enjoy in a future recipe.

Saturday, September 1, 2012

Canning Peaches

Last year, I made jam out of the peach harvest. I still have some jars in the pantry. This year's harvest was just canned over the last two weekends. It was quite an event with multiple pans going all at once: the hot water bath pan, a saucepan to boil the lids, boiling water to dip the peaches into, and a simple syrup.

I have an old Ball Blue Book from the '50's and it's pretty much the bible for canning. When I went online and looked canning peaches, it's amazing how little has changed. If you don't have this book, you need to get a copy.

So here are the "cheat sheet" directions

  • Drop batches of peaches into boiling water for about 1 minute and then transfer to a bowl of ice water. The riper the peaches, the easier the peel will come off.
  • Remove skin; halve and pit; place face down in a sterile jar. You may need to quarter the peaches.
  • Gently push down on the peaches to maximize the space as you begin to fill up the jar.
  • Ladle in syrup to cover leaving about a 1/2 of head space.
  • Run a knife along the inside edge of the peaches to remove air bubbles.
  • Clean the rim of the jar with a damp paper towel.
  • Put on the lid and drop into a boiling water bath with a water level above the jar lid.
  • Boil for 30 minutes and remove.
  • Place jars on a towel to dry for 12 hours.
  • Listen for the "pop" of the jars as the lids seal as it cools.
For this first time run, I went with the extra light syrup and I had to make a second batch:

Syrup
  • 1 1/4 cup sugar
  • 5 1/4 water
Add sugar and stir until dissolved. Bring to a boil and ladle into jars.

Here's the formula:
Extra light = 1 1/4 cups sugar to 5 1/4 cups water
Light = 2 1/4 cup sugar to 5 cups water
Medium = 3 1/4 cup sugar to 5 cups water
Heavy = 4 /1/4 cups sugar to 4 /1/4 cups water


Here are some YouTube videos that demonstrate the process.

http://www.youtube.com/watch?v=KoyEV0p0Ky8

http://www.youtube.com/watch?v=G309JyFpuFs


Sunday, August 14, 2011

Peach Preserves


I made a visit to a neighboring suburban town to buy some eggs from our source. They also have an extensive garden and fruit orchard. So in addition to the 18 fresh eggs, I also came home with with a few pounds of green and yellow beans, some yellow cucumbers, and about twenty big, beautiful peaches that I decided would become my first attempt at peach preserves. Right on the heel of the apricot preserves the week before! But for this post I felt I should elaborate more about what I'm learning about canning and preserving.

I turned first to the bible of canning and preserving--The Ball Blue Book which had two recipes. But I was also intrigued by the Chunky Peach Preserves in Janet Fletcher's "Fresh From the Farmer's Market." So I ended morphing the three recipes.

Peach Preserves

Ingredients:
  • 10-12 large ripe peaches
  • sugar
  • lemon juice - 2/3 cup (I only had half a lemon on hand so that's what I used)
Now, as for the sugar, Ball Blue Book calls for 6 cups which seemed like a lot to me. If you look online, you will find varying amounts in the recipes including some with no sugar. I will continue to experiment with the amount of sugar but for this batch I went with about 4 to 4 1/2 cups.

Steps:
  1. Get a large pot of water boiling.
  2. As the water gets close to boiling, prepare a large bowl of ice water nearby.
  3. With a slotted spoon, lower peaches, a few at a time, into the boiling water and blanch for about 30 seconds.
  4. Transfer peaches to the ice water bath.
  5. When cool, lift out the peaches and peel away the skin.
  6. Cut the peaches in half, then fourths, then eighths, and then cut around the equator. The goal is to create chunks about 1 square inch each. Discard any blemished or bruised portions. Place the chunks into a large, non-reactive pot (glass or enameled cast iron).
  7. Add the lemon juice and sugar and stir until the sugar is dissolved.
  8. Let it sit for 12-18 hours or overnight. I did it overnight putting it in the refrigerator overnight.
Next Day:
  1. Slowly get the peach mixture to boiling, stirring frequently.
  2. Boil and stir frequently until the mixture is clear and the syrup is thick. The syrup should be golden brown.
  • If the syrup becomes too thick before the fruit is tender then add some boiling water (1/4 cup at a time).
  • If the syrup is too thin you can drain the fruit in a bowl and return the syrup to the pot and cook it until it thickens up.
  • A tip I have seen online is to spoon a bit of the syrup onto a small plate and stick it in the freezer for a couple of minutes to cool it. When you take it out it should jelly-like but still able to slowly flow when tilted.
Canning Process:

Once you have the preserves ready to get them into the jars start by sterilizing the jars by putting them into a dishwasher that sterilizes or put the jars in boiling water for 10-20 minutes. It's always a good idea to sterilize a few more jars than you think you'll need just in case. Place the lids in a separate pot of boiling water to sterilize.

When the preserves are ready, spoon them into a clean, hot jar within a 1/2 inch of the top. Wipe the rim clean with a towel dipped in hot water. Place lids on and secure tightly.

For long term storage, place the filled jars into boiling water that covers the jars by one inch. Boil 15 minutes for half-pint jars and 20 minutes for pint jars. Transfer with tongs to rack to cool. Sealed jars prepared this way can be stored in the pantry for up to a year.

This particular batch yielded four pints and a little extra.

If you are new to canning, Lehman's is a great place to get your supplies. They sell a canning starter kit where you can get the lid lifter, tongs, jar funnel, and other supplies that are essential to canning. I've also found some of these same supplies at garage sales and antique fairs.

Thursday, August 4, 2011

Apricot Preserves


We harvested a number of pounds of apricots from our tree in the backyard recently. Apricots have a very short season and shelf life so it's good to have ways to quickly utilize them and preserve them. Visit the California apricot web site to find out more information about California apricots.

I decided to try my hand at apricot preserves. I did some searching online and ended up borrowing heavily from this site. Not being a big sugar fan, I like how this particular recipe is lighter on the sugar than other recipes. I also like my preserves with chunks of the fruit. So in my version, I added the apricots in waves of thirds. The longer they cook, the more they will reduce down. So by doing them in thirds, I am going for a mix of pure jam along with some nice chunks of fruit.

Apricot Preserves
  • 20-30 fresh apricots
  • 1 1/3 cup sugar
  • 1/4 cup water
  • 2 Tbs fresh lemon juice
Directions:
  • Melt the sugar and water in an enameled cast iron pot or other non-reactive pot and bring to a boil until clear and syrupy.
  • Meanwhile, cut the washed apricots in half discarding the pits.
  • As you cut up the first third of the apricots, add them to the sugar mixture and stir to coat them. The fire should be on medium low so that the apricots cook down but it should not be bubbling.
  • Add in another third of the apricots when they are ready. Stir frequently.
  • Add in the final third. Stir until they are reduced but still chunky. Total cooking time will be an hour or more.
  • Add in the lemon juice and stir.
Sterilize some jars and add the preserves following proper sanitary canning techniques.

I can't yet say how it tastes. I put them in the pantry to enjoy later.

Monday, October 25, 2010

Spaghetti Sauce - Batch #1


Another first!

My first batch of homemade spaghetti sauce! I ended up with 3 pints to put away for another day. I merged a couple of online recipes and came up with the following.
This is only batch #1 so it may evolve.

Homemade Spaghetti Sauce
  • 40 - 50 tomatoes - mostly Romas from the backyard
  • 1/2 large yellow onion, chopped (probably more next time)
  • 1/2 red bell pepper, finely diced
  • 2 - 3 cloves garlic, minced
  • 1 small can of tomato paste
  • 10 - 12 basil leaves, finely chopped (also from the backyard)
  • 2 bay leaves
  • 1/4 teaspoon freshly ground black pepper
  • 1 tablespoon Italian herb mix
  • 1 tablespoon oregano
  • 1/4 teaspoon red pepper flakes
  • 1 teaspoon parsley
  • 1 teaspoon salt
  • pinch of sugar
  • 1/4 cup red wine (a 2007 Christopher Creek Cab from the cellar)
I washed and dried the tomatoes and then put them through the food mill. I got the sauce boiling so that it began to cook down and added the bay leaves, salt, and sugar. Meanwhile, I chopped up all the other ingredients. In a 12" skillet, I sauteed the onions for a few minutes, added the garlic, and then the bell pepper. Added in the herbs and seasonings. I waited until the sauce was about an hour or two away from being done and then added the onion/pepper mixture from the skillet. Add the tomato paste and let it cook down until desired consistency. Discard bay leaves. Add sauce to sterilized jars.

Inspiration:

http://www.pickyourown.org/spaghettisauce.htm

http://www.suite101.com/content/homemade-spaghetti-sauce-a61353

Monday, October 11, 2010

Tomato Sauce, Part 2


With so much produce coming from the backyard, I have wanted to learn how to can for a few years now. I bookmarked this helpful site along with some others to help me learn the process. I've been buying used books on canning and preserving and, of course, have Ball Blue Book which is THE source of information on canning (although I'm told it's too cautious). I've also been slowly acquiring all of the needed equipment. Most of it through this interesting store based out of Ohio called Lehman's but also through antique stores. Last year, I spent an afternoon with a friend who has been canning for years to see it all in real life.

I finally took the plunge a few weeks ago when I was given four plastic shopping bags full of ripe tomatoes. So for the last few weeks I have been making a basic tomato sauce. So far, no explosions in the pantry. Why not make it into spaghetti sauce or something else? I will try that at some point but with basic tomato sauce you can let it be whatever you want it to be when you open the jar.


Here's what I have been doing.

Basic Tomato Sauce
  • Start with ripe tomatoes and lots of them. Wash the tomatoes ahead of time and let them dry.
  • Core the tomatoes and cut in half or quarters depending on the size. Be sure to cut off any blemishes on the skin.
  • Put into the food mill to separate seeds and skin from meat. A few years back I bought this food mill and find that I don't need to peel the tomatoes ahead of time. It does a great job separating the skins and the seeds from the pulp. Put all of the pulp into a pot (or two, if necessary) and bring to a boil. Reduce heat so that the tomato sauce is bubbling gently and moving around the pot.
  • Put more than enough jars in the dishwasher to sterilize.
  • Cook until reduced until it reaches desired consistency. If you look around online, you'll see some people saying one hour and others saying six hours. It all depends on how thick you want it. I like it pretty thick so I let it go for a few hours.
  • Towards the end of the cooking time add 1 small can of tomato paste.
  • Put the lids in a small pot with gently boiling water.
  • When sauce is done, spoon hot sauce into hot jars to 1/4 inch below the lid line using a jar funnel. Fish the lids out of the boiling water. Seal jars and turn upside down on towel for a period of time to sterilize the trapped air and lid.
  • Upright the jar and let cool at room temperature. After they have cooled down check the seal.
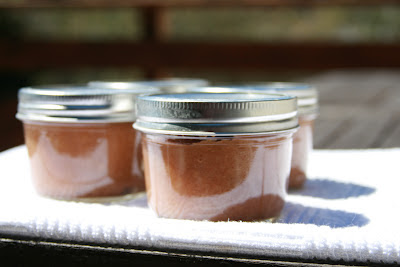
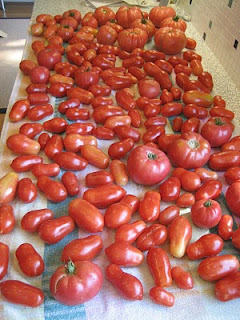
The tomatoes in the top photo are from my backyard this last weekend. All of those tomatoes yielded two quarts of sauce.

Wednesday, October 6, 2010

Tomato Sauce

How many tomatoes does it take to make a quart jar of plain tomato sauce?

I figure 80 to 100. This is based on the fact that I brought home about 200-250 tomatoes from a friend's house and made two batches of tomato sauce and ended up with two quarts of sauce (well, plus some extra sauce that I put in a freezer bag).

This was my first venture into canning. I've been prepping for a few years. That's how nervous I was. So far so good.

Outside in the backyard the Roma tomato plants are starting to get there. The other generic tomato plant that I have is also finally starting to produce some fruit. It looks like this weekend will be another sauce-making weekend.

More on all this later.