Thursday, November 28, 2013

Kiwi Apple Dressing

We had a number of kiwis in our CSA box recently. I was intrigued by one of the suggested recipes on the sheet in the box. But more on that later.

While researching the background of this fruit, I learned that the name kiwi is has been shortened from its official name: kiwifruit. Most people also assume that kiwis must be from New Zealand. They are actually originally native to northern China where they were declared the National Fruit of China and called "yáng táo." Seeds were taken back to New Zealand where they first fruited in 1910. Twenty years later, they were becoming popular in New Zealand where they were called Chinese Gooseberry. During the WWII years, "Chinese Gooseberry" was too political so it was named "melonette" for a brief time. Then a New Zealand grower and exporter dubbed it kiwifruit in 1959; after the New Zealand bird, kiwi (both small, brown, and furry).

This dressing is super easy to make and is quite unique. Tasting right after its made reveals a lot of complexity with many different flavors working quite well together.

Once you add it as a dressing on a salad you will find that it's a unique, clean, peppery, tangy dressing that is unlike typical dressings you've had. 

Kiwi Apple Dressing:


Ingredients:
  • 2 Tbsp. apple cider vinegar
  • 2 Tbsp. apple juice
  • 1 Tbsp. olive oil
  • 1 Tbsp. water
  • 1/2 teaspoon salt
  • 1/2 teaspoon sugar
  • 1/4 teaspoon freshly cracked pepper
  • 1/4 teaspoon hot pepper sauce (I used Crystal)
  • 3 kiwifruit, peeled and cut into chunks
  • 1 clove garlic, minced
Combine all ingredients in a blender or small food processor and process until smooth.

Refrigerate dressing in an airtight container for up to five days. Stir well before using.

Monday, October 14, 2013

In the Garden: Roasted Tomatillo Salsa

Things are winding down in the garden. I will probably start pulling up the tomato plants soon. For the first time this year, I planted a tomatillo plant and I wasn't sure what to expect. But I quickly learned that tomatillo plants need a good amount of space. While you can keep tomatoes somewhat contained in cages, tomatillos are more of a sprawling plant that can grow 3 feet tall as well as wide. It shot out branches into the nearby basil plants. Since it likely didn't get the sun it needed, my tomatillos were somewhat smaller than normal; though maybe normal for home gardens. One of my goals in planting tomatillos this year was to make salsa verde.

Now I luckily live in a part of the country where I can usually find fresh tomatillos in my supermarket. But the other day in my local supermarket I noticed that canned tomatillos are an option. You will find a variety of opinions about how they compare to fresh but if you have no other choice it's an option.

While we're on the topic, salsa may be one of those condiments (like ketchup and mustard) that don't get used on a daily basis. So you spend $4 on a bottle of salsa and a few months later you find it has turned into a science experiment. I recently read an article suggesting that a more frugal alternative is to spend less than a buck for a 7 ounce can of the highly-rated Herdez salsa verde. You are more likely to use it up before it gets bad. And even if it does go bad, you're out a buck. Look for the 7 ounce can next time you're at the market. I have walked past it all these years because it's not in the same place as the bottled salsas.

Now to the salsa that I made during halftime of the most recent 49er game:

Roasted Tomatillo Salsa

  • 12 good sized tomatillos
  • 3-4 Serrano chiles (4=a very spicy salsa so judge accordingly)
  • 1/3 cup cilantro leaves, chopped
  • 1/4 cup white onion, finely chopped and rinsed

I will let Rick describe the recipe for you and then some.


My variation was to add both the chopped cilantro and onions into the food processor right towards the end. It was a good way to really incorporate the cilantro and onions into the salsa. Garlic and lime juice can also be introduced as additional ingredients. You can always thin it with water as well.

More resources:
LA Times article 
Bonnie Plants: Growing Tomatillos
Sunset Magazine article
YouTube video

Tuesday, September 24, 2013

Spicy Pickled Corn


I'm just starting to get into pickling. I've been drawn to a number of recipes that involve pickling recently. I'm fascinated by the process of preserving fresh produce in this method.

At this time of year it's all about preserving the good produce. Recently, our supermarket had Brentwood corn 6 for $1. Incredible. We picked up six ears and had two for dinner. I dog-eared this recipe in a recent Bon App magazine and gave it a try as way to use up the other four ears of corn. The photo in the magazine was gorgeous and it captured my curiosity.

I made 3 jars. I put up two and one was not filled enough to store so I stuck it in the fridge and figured out how to use it up. I have added the spicy corn to salads, omelettes, and stir fries with good success. It packs a spicy punch so be aware of the heat as you work with it.

I doubled this recipe:

Spicy Pickled Corn

In a large bowl, combine:
  • 2 small red dried chilies
  • 1 seeded thinly sliced jalapeno pepper
  • 1/4 thinly sliced medium red onion
  • 2 ears corn kernels cut off of cooked corn cobs (a few minutes in boiling salted water)
  • 1/4 cup fresh cilantro leaves
  • 1/4 cup lime juice
  • 1/4 tsp. coarsely ground black pepper
Brine
  • 1/2 cup white wine or apple cider vinegar
  • 2 tsp. kosher salt
  • 1 tsp. sugar
  • 3/4 cup water
Bring brine to a boil. Pack sterile jars with corn mixture. Pour brine over the corn mixture to fill the jar (I ended up doubling the already doubled brine mixture). Put the lids on the jars and put them in a hot water bath for 15 minutes. Or else stick jars in the fridge and use up the contents within a few weeks.

Monday, September 9, 2013

Avocado Chimichurri Bruschetta

We were attending a dinner party and we had committed to bringing an appetizer. The theme of the dinner party was a celebration of the end of summer produce. As the date drew closer, we still had not decided on our appetizer. Finally, we decided on making a tomato bruschetta using some backyard tomatoes and CSA box heirloom tomatoes.

But while looking at recipes online, I found this Vegetarian Times recipe so I went for a double bruschetta appetizer. The traditional tomato bruschetta was well received but did not get the raves that this one did.

Serve this during the height of summer or, as we did, in late summer as a reminder of the fresh produce available to us as the days get shorter.

I doubled this recipe:

Avocado Chimichurri Bruschetta

  • 2 tbsp. lemon juice
  • 2 tbsp. red wine vinegar
  • 3 cloves garlic, minced
  • 3/4 tsp. salt
  • 1/2 tsp. red pepper flakes
  • 1/2 tsp. dried oregano
  • 1/4 tsp. ground black pepper
  • 1/4 cup olive oil
  • 1/4 cup cilantro, finely chopped
  • 1/4 cup parsley, finely chopped
  • 2 avocados, pitted and cubed
  • bread, sliced
Combine lemon juice, vinegar, salt, red pepper flakes, oregano, and black pepper in a bowl. Whisk in the oil, then add cilantro and parsley. Fold in avocado cubes. Stir to mix. Spoon avocado mixture onto bread slices (toasting is an option) and serve. Serves 6.

To save time, make the sauce ahead of time but cut the avocados at the last minute.

Wednesday, August 28, 2013

Limoncello Vinaigrette

Awhile ago, I started to experiment with making some homemade limoncello. After a few experiments, I had a 750 ml. bottle plus a ton of jars of it in the pantry. It's a recipe I still need to get back to and continue to perfect. But that's a lot of limoncello for the occasional "digestivo." I had more than a lifetime supply.  So I have been looking for alternative uses for all of my limoncello.

I tried a limoncello and tonic on a hot, summer day and it was pretty good. But I needed more ideas.

Then, I found this recipe online for a limoncello vinaigrette and thought this might be a good way to make a dent in the limoncello.

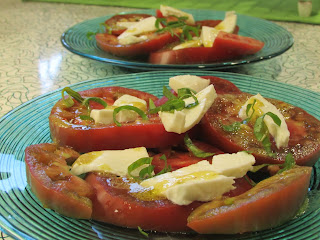
I used it for the first time on a recent dinner. We had some beautiful heirloom tomatoes from our box and some mozzarella cheese. I sliced up the tomatoes and topped them with slices of mozzarella. I added some backyard basil chiffonade and a drizzle of the limoncello vinaigrette on top.

On another night, we had an eggplant so I sliced it, tossed it with some olive oil, and roasted them on the barbecue. As they cooked, I brushed the slices with the vinaigrette with excellent results.

Most recently, I marinated some shrimp in the vinaigrette. I went on to cook them in the skillet for a tasty, weeknight pasta dish. Carnivores can try it with chicken.

Here is another idea:
Mario Batali's Grilled Lobsters with Limoncello Vinaigrette

It's a tasty and versatile vinaigrette with lots of possibilities.

Limoncello Vinaigrette

  • 1/4 cup limoncello
  • 2 teaspoons lemon juice
  • 1 teaspoon grated lemon zest
  • 2 teaspoons Dijon-style mustard (original recipe called for 1 1/5 but 2 or more for me)
  • 1/4 teaspoon red pepper flakes (I went a little more than that)
  • 1/2 extra virgin olive oil
  • freshly cracked black pepper
  • Salt to taste
Combine all ingredients in a bowl and stir to mix. Keeps for a week or so.

Wednesday, June 19, 2013

Nectarine Carpaccio with Basil


We were paging through a recent Vegetarian Times when this recipe caught our eye. We had received some nectarines in our box and we got a few more at our local farmer's market just because it's that time of year.

I was also able to use some just-picked basil leaves from my backyard in this one.

We were having some friends over and we thought this would make a great appetizer.

It comes from Chef Eric Lechausseur, executive chef of Seed Kitchen in Venice, CA. In the write up, he describes how he likes the mixture of fruit and herb because "the nectarine's acidity combines with the freshness of basil for a wonderful flavor."

The ingredients are pretty simple:

  • nectarines
  • basil leaves
  • lemon
  • olive oil
  • salt
  • pepper

Here's how it works:


You want to start with nectarines that are neither too ripe or not ripe enough. Place the washed nectarine on a cutting board with the "crease" facing you. That way the pit is lined up to give you the maximum number of slices.

Slice off a bit of the peel from the right side to get the slicing started.

Start cutting thin slices.

When you run into the pit, turn the nectarine around and repeat the above on the other side.

You will have a small leftover section on either side. That's your reward for being the cook.

Arrange overlapping nectarine slices on a platter. In a bowl, combine the juice of half of a juicy lemon, just under 1/3 cup high quality olive oil, a generous dash of salt, and a good amount of cracked black pepper.
Get enough basil leaves for the number of nectarine slices you have. You will actually want small to medium sized leaves. Drizzle the dressing over the nectarine/basil slices
Serve out in the backyard enjoying the long days of June and the beginning of summer. We served it with a Viognier which worked well with this dish. We decided this was a keeper.


Sunday, June 9, 2013

Alice's Carrots

One of the staple items we get in the box is carrots. Bunches of Nantes carrots to be exact. Normally, I would peel and chop one or two raw carrots to add to a salad. Despite our best efforts, there were some weeks when we did not fully utilize the carrots.

While talking to some friends who also get the same CSA box, they said their "go to" recipe for carrots is the glazed carrots recipe (page 298) from The Art of Simple Food by Alice Waters. Since hearing about this, I've made this a handful of times and it's a keeper.

As Alice says, "it's more of a technique than a recipe."

It's deceptively simple and it makes an easy side dish.

It goes like this:

  • Peel the carrots (however many you need to feed). If the carrots are fairly thick, you can halve them.
  • Put the carrots in a pan and add water to come up about halfway up the carrots. Use a pan big enough to allow you to keep all of the carrots in a single layer.
  • Add a good pinch of salt and a pat of butter.
  • A few cracks of fresh pepper is always good.
  • Bring to a boil then turn down the heat to a simmer.
  • Cover the pan and simmer until water evaporates.
  • As the water level gets low, shake the pan to distribute the buttery glaze over the carrots.
  • I like to let the butter brown the carrots a bit in the pan.
  • Prior to serving, you can add some chopped herbs. Parsley, chives, and basil would work.


Wednesday, May 22, 2013

In the Garden: May 2013

I have one little spot yet to fill but most of the garden is now in the ground.

This year's crop includes:

  • 1 San Marzano Roma tomato
  • 2 Roma tomato
  • 2 Martino Roma Heirloom
  • 1 tomatillo
  • 1 jalapeno pepper
  • 1 green bean
  • 8 basil
  • 6 kale
  • 1 Alpine strawberry
  • 1 regular strawberry
I am hoping I get to try my hand at making salsa verde with the tomatillo and jalapeno.

Of course, lots of basil to hopefully make lots of pesto to freeze to use throughout the year.

And then some of the usual suspects for a summer garden. No lettuce this year, since we get a steady supply from the CSA box. Same for the summer squash. 

Nearby, the apricot tree is doing well. The apricots are closing in on their full size but they are still green. We got it trimmed earlier this year and we were told that the trim might cause a smaller crop but that doesn't seem to be the case.  It's still a big tree (despite being advertised as a dwarf) and it because of that it tends to shadow one end of one of the beds. Last year, the zucchini was in that shady spot and I got one zucchini out of it. This year, I put the Alpine strawberry in a pot in the shady spot so I can move into full sun if I need to.

Wednesday, May 1, 2013

Bok Choy and Tofu Noodle Bowl

Bok choy, or Chinese cabbage, has never been too high on the list of veggies that we just love to eat. But we tend to get waves of it in our box and I try to figure out tasty ways to use it up. So I've been trying different recipes that make the most of our bok choy and here's where I currently stand.

This recipe was inspired by a Sunset magazine recipe that caught my eye. The first time I made it, though, I wrote down a number of improvements to upgrade the recipe. So what follows is my current version of the recipe after making it a handful of times.

It's becoming our "go to" recipe for bok choy and it's a great weeknight Asian noodle bowl experience.

Bok Choy and Tofu Noodle Bowl

Ingredients: (Serves 2- 4)
  • 2 pkg. Udon noodles - or substitute another Asian noodle
  • 1 pkg. baked flavored tofu - there are many to choose from
  • 2 tbsp. soy sauce
  • 1 tsp. sesame oil
  • 1-2 cloves garlic - minced
  • 4-5 baby bok choy - coarsely chopped
  • 1 cup vegetable broth
  • 1 tsp. Sriracha sauce
  • 2 green onions, trimmed and chopped
  • Ginger powder - a few shakes - or use 1 tbsp. of the real thing, minced
  • cooking oil


Directions:

Clean the bok choy. There are lots of places in bok choy for dirt and small critters so give it a thorough washing. Coarsely chop discarding the bases.

Cut the tofu into rectangles.

In a bowl, combine the broth, soy sauce, ginger, sesame oil, and Sririacha. Stir to mix.

Bring a pot of water to boil and add the udon noodles. Now, I got packaged udon noodle in the refrigerated section of my grocery store. Even though I picked up the "original" flavor package, it still came with the seasoning envelope. These things are scary. The first two ingredients are sugar and salt. And then there's a whole host of ingredients that breaks the Michael Pollan rule to not eat stuff your grandmother would not recognize. Instead cook the noodles in a water/broth mix and toss in some soy sauce and/or Sriracha to give the noodles some flavor. Cook the noodles for a few minutes and drain in a colander.

While the water comes to a boil, chop those green onions.

In a large skillet or wok, heat the cooking oil. Add the minced garlic and cook for a minute. Add the ginger, bok choy, and tofu and cook for a few minutes. Add the broth mixture and cook until heated.

Divide the noodles among the bowls. Add the bok choy/tofu mixture. Spoon in the sauce from the skillet or wok. Sprinkle green onions on top and serve.

Thursday, April 11, 2013

Shrimp and White Bean Salad with Harissa Dressing

As I find recipes in magazines and newspapers I cut them out and tape them into a spiral notebook. I have three or four such notebooks full of taped recipes. There are way more recipes that I've never tried than ones I've done. Sometimes I go through one of the notebooks and tear out some of the recipes that I know I will never get to freeing up space for newer recipes.

It was during one of these reviews that I stumbled upon a Sunset recipe that I had I cut out and taped into a notebook. As I skimmed it, I knew that I had most of the ingredients on hand and I could substitute the rest.

This turned out to to be a great starting point for a quick and tasty weeknight meal with lot of substitution options.

Let's start with the dressing for the salad. There will be leftover dressing so figure out another use for it.

Harissa Dressing:
  • 2-4 Tbsp. Harissa - I had some Harissa in the pantry but if you don't, you could use Rooster sauce or Chili Garlic Sauce from Huy Yong Foods (I keep both of these always stocked in my fridge)
  • 1/4 cup lemon juice
  • 1/3 cup olive oil
  • 1 large garlic clove, minced
  • 1/2 tsp. salt
Mix together in a bowl and set aside to let the flavors marry.


Salad:
  • 1-2 cups of greens - the original recipe called for an arugula and parsley mix. I used half of a bag of Trader Joe's mixed baby greens which featured baby kale, chard, and spinach. Be creative and use your favorite greens.
  • 1 can of Cannellini beans. Drained and rinsed.
  • 1 celery stalk, sliced on the 45 degree angle
  • 1 thawed 12 oz bag of shrimp, deveined with shells and tails off. Safeway has a new brand of American farmed shrimp under the Open Nature label.
Cook the shrimp in a hot skillet with butter and olive oil mix until done. Toss in cracked pepper and a few pinches of salt. Lower heat when shrimp are done and add drained beans.

Make a bed of greens and add the sliced celery. Top with the shrimp and bean mixture. Spoon the harissa dressing over the top.

This is a super easy and tasty weeknight dinner. This recipe feeds two people. If you need to feed more, double the salad recipe but not the dressing.


Sunday, February 24, 2013

Weeknight White Bean, Sausage, and Kale Soup

The CSA box arrives very early on Friday mornings and I usually go out and retrieve it as a part of my morning routine. This last Friday, I brought the box in and took a quick look at the contents before heading off to work. I noticed the Lacinato kale sitting on top and for some reason my mind went right to soup. Now, that's because Lacinato kale has a thicker leaf and it needs more time than other greens to break down. Letting it simmer in a soup is an excellent way to soften the kale leaves.

We were introduced to Lacinato kale through the box. At first, I was not a big fan. But over the years I've learned that to appreciate it and have adjusted my cooking methods to deal with the thick leaves that resemble dinosaur skin giving it the nickname "Dino" kale. The best ways to prepare Lacinto kale:

  • Blanch the leaves in hot, salted water prior to preparation
  • Let the simmer in broth for a soup for awhile
  • Use an acid, like lemon juice, to break down the membranes. 

So on the way home from work, I stopped off at my local Trader Joe's and picked up veggie broth, a can of white beans, their "sausage-less" Italian sausage, and some good bread.

When I got home I unpacked the box and found that one of the suggested recipes was very much what I was planning. But my version was going to be the weeknight version.

While the broth was heating up, I stemmed the kale, cut it up into smaller strips, and added it to the stock. I added into the broth a bay leaf, a clove of minced garlic, a generous amount of black pepper, and a shake of red pepper flakes. Then I put in a few shakes of same various herbs.

The TJ's sausage is not the most appealing at first glance. But I sliced it up and browned it nicely in a small skillet. I wanted a crispy outside to stand up in the soup.

I added in some sliced carrots that were also in the box and the drained beans.

All of the remaining ingredient were added to the soup and I let it heat up. A green salad (lettuce, radishes, and avocado from the box) and bread were prepared to accompany the soup which went over well after a hectic week of work.

Here's my iPhone shot of the leftover soup that became my lunch on Saturday.


Saturday, January 26, 2013

Butternut Squash Backlog


We've been getting a butternut squash each week in our CSA box for the last number of weeks. I am being very creative in the places that I store them in the pantry. Thankfully, they keep for awhile.

With some friends coming over for dinner recently, I saw an opportunity to use up the largest of the herd. I would make a butternut squash risotto. I looked online to see if there were any interesting variations. When I found this recipe (which I adapted below), I was reminded of the small container of saffron that was given to me over the holidays also sitting in the pantry.

Now, saffron is not absolutely essential to the recipe. It is the most expensive spice in the world since it must be hand harvested. But the good news is that a little goes a long way. On Amazon you can find some small amounts of saffron for less than $20 and you will get 3 - 4 uses out of it.

But the saffron elevates the typical butternut squash risotto to another level. The saffron imparts a subtle flavor but it also gives the risotto an exotic shade of light yellow.

A drizzle of truffle oil over the bowls just prior to serving gives the dish a heady aroma.

Saffron Risotto with Butternut Squash


Ingredients
  • 1 large butternut squash (2 pounds)
  • 2 tablespoons olive oil
  • 3/4 stick of butter
  • 1/2 cup minced shallots
  • 1 1/2 cups Arborio rice
  • 1/2 cup dry white wine
  • 6 cups of broth, preferably homemade
  • 1 cup Parmesan cheese, shredded
  • 1 teaspoon saffron threads
  • salt and pepper
  • truffle oil (optional)
Directions
  • Preheat oven to 400
  • Peel, seed and cube the butternut squash
  • Place on a cookie sheet covered with foil, toss with oil, salt, and pepper and roast for 25 - 30 minutes, until tender (can be done the day before)
  • In a heavy-bottomed pot, melt the butter and saute the shallots on medium low for 10 minutes until shallots are translucent but not browned
  • Add the rice and stir to coat the grains with butter
  • Add the white wine and cook for a few minutes, stirring often
  • Add a cup or two of heated stock, 1 teaspoon of salt, and a some fresh black pepper
  • Continue adding stock as the previous batch gets absorbed, stirring often
  • Add the saffron and squash about halfway through along with the next batch of stock
  • Continue until rice is cooked but still al dente - 20 - 30 minutes
  • Stir in cheese, turn off the heat and let stand for 10 minutes
  • Optional: Serve in bowls and drizzle with truffle oil 
Serves 6.